So if you are new to my blog, Hello! I took July off to focus on work and realities of covid life. Thanks for hanging in there.

 My next steps in the process was to decide on the size I wanted. Based on my sources the size could range quite a bit. The must I had was making it large enough to comfortably hold my cell phone. After establishing size and depth of the slit into the pocket I drew the design free hand onto the pocket front with a washable pattern pencil.


This week we are doing to cover 16th Soccocia and their role toward the origin of pockets. People need a place to carry and keep their small items as they walk around. In the middle ages you might have a pilgrim satchel or a belt pouch. Some women in the middle ages had the brilliant idea to stop wearing their money purses outside of their over gowns and instead would wear them between their kirtle/sottona layer and over gowns. This arrangement still gave you access to the purse, but made it harder for thieves to cut your purse strings and run.
Fast forward to the 16th century and we find the heirs to this practice in socaccia. We have some visual evidence of these in mid to late 16th century art out of Italy. This is a detail of Alessandro Allori's, Woman at her toilet, ca 1575-78. Currently in Florence, Church of Santa Maria Novella, Gaddi Chapel.

Janet Arnold also writes about one found in the folds of Elenora di Toledo's funeral garments in Patterns of Fashion 3.
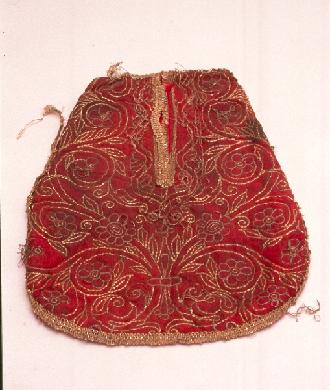
A few years ago I also came across this scrumptious example from Spain with enough gold work to be worth stealing on it's own if I were a cut purse. I have lost the information on the date of this piece.
My Soccocia
With all that lovely inspiration of course my historical Belle cosplay needs a practical Soccocia. My first step was picking a design for embroidery. It wouldn't make sense for Belle to have a ton of gold embroidery on a pocket when she could be buying books. I instead decided on silk embroidery. The pattern is from the late 16th to early 17th century The Schoole House of the Needle. Doesn't this fluer call out for Belle?


I wish I had stopped more frequently to get photos of the embroidery as I went bit it truly only took a few days. One whole day was spent preparing some hand dyed silks I wanted to use which arrived in hanks rather than pre-wound cards.

The finished design in stem stitch, split stitch, and satin stitch is pretty, but I still wanted more impact. I was able to det these tiny brass plates which are historically correct sequins and stitched them on with waxed silk thread.


The pocket is lined in lightweight linen to give stability and protect the back of my embroidery. I then bound it with some straight cut strips of silk.

The piece across the top is long enough to act as a tie around my waist so I don't have to worry about it attaching to stays. On to the next portion, a camicia! For real time progress pictures check me out on Instagram.

Those are lovely!
ReplyDelete